By: Garrett Jamieson, NFI Certified Master Hearth Professional

How to Build a Gas Fire Pit
Learn the proper sizing, ventilation, and safety requirements to create your custom gas fire pit
Last Updated: February 26, 2026
Adding a gas fire pit can transform your outdoor living space into a cozy and inviting area you can use in every season. Unlike wood burning fire pits, gas models offer convenience, cleaner burning, and easy ignition.
Whether you want to build a DIY fire pit from scratch or modify an existing one, there are a few important details to nail down first.
We’ve broken down step-by-step all the essential decisions you’ll need to make, the parts you’ll need to purchase, and the safety precautions that must be followed to complete a Do-It-Yourself outdoor fire pit successfully!
Location
The first thing you’ll need to decide is where your fire pit will go in your outdoor space. It must sit on a flat, level surface, such as a patio, deck, or leveled yard.
If you’re installing your fire pit on a deck, you’ll need to look for a model that’s approved for safe installation on combustible surfaces. You’ll also need to add a non-combustible base, like a stone or concrete slab, underneath the fire pit to prevent radiant heat from transferring to your deck.
Popular non-combustible base materials approved for decks include bricks, pavers, Hardie Board, and Dura Rock.

Pro Tip:
We do not recommend installing your gas fire pit on grass. Over time, the ground beneath may shift and displace it, causing issues with safety and performance.
 Pro Tip:
Proximity
Make sure your fire pit is a safe distance away from anything that could easily catch fire, like plants, patio furniture, and decor. The area should be open, clear, and free of low-hanging trees, foliage, and other flammable materials.
Overall, the style and size of your gas burner will determine the exact amount of clearance you need to plan for. Carefully read the clearance requirements outlined in the owner’s manual that comes with your burner.
Pro Tip:
Check any city ordinances to make sure your fire pit is legal and will be up to code.
Fuel Type
Next, you’ll need to decide what type of fuel you want to use. There are Propane and Natural Gas fire pits.
Natural Gas
Using Natural Gas as your fuel source is ideal if you want to build a permanent fire pit for your outdoor space.
You will need to hire a licensed gas professional to install a Natural Gas line on your property and run it to your fire pit. Attempting to hook up a Natural Gas line yourself without the proper training can cause a fire hazard.
Once your Natural Gas line is connected, your fire pit will receive a constant flow of gas, saving you time and money on replacement Propane tanks.
Propane
On the other hand, Propane tanks allow you to build a more portable fire feature and require minimal installation.
If you have a large Propane tank on-site, you can hire a gas professional to run a gas line underground that connects to your fire pit — like a Natural Gas line — making it a permanent part of your outdoor space.
Pro Tip:
You’ll need to hire a licensed gas plumber to run a permanent gas line to the fire pit location.
Ventilation
No matter what kind of fire pit you're building, you'll need to include ventilation in the enclosure.
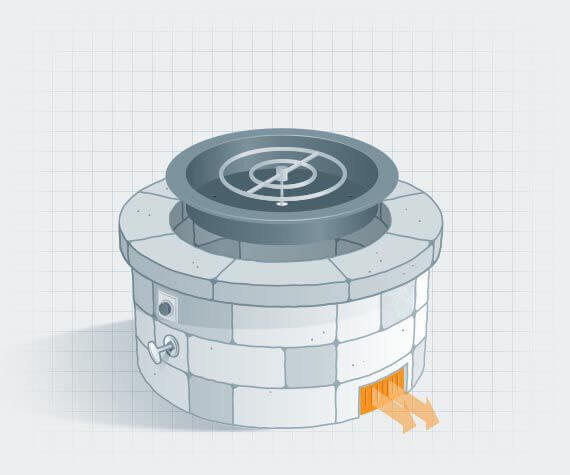
Ventilation provides fresh air for the ignition system to work properly, allows for continuous airflow and water drainage, and prevents gas and heat from building up inside your fire pit enclosure.
Without enough ventilation, the gas and heat buildup inside the enclosure could lead to an explosion.
Ventilation should include at least two built-in air vents on opposite sides of the fire pit. If your fire pit doesn't have an open bottom, you can create adequate airflow by using risers to elevate the fire pit off the ground.
Pro Tip:
Propane is heavier than air and will sink to the bottom of your fire pit. Install the air vents on opposite sides of the fire pit toward the bottom of the base. Natural Gas is lighter than air and will rise to the top of the fire pit. Install the air vents on opposite sides of the fire pit toward top of the base.
Enclosure Styles
The enclosure is the body of your fire pit. It houses the burner system along with the gas and ignition components.
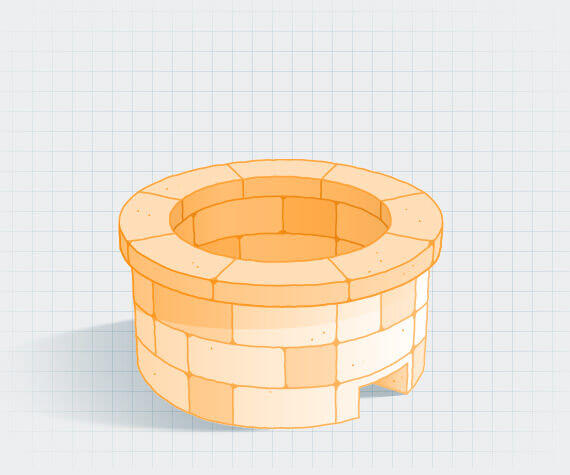
Many homeowners choose to build their enclosures out of masonry bricks, while others purchase unfinished enclosures, which are available individually or as a kit.
DIY fire pit kits make building a fire pit much easier. Most come with all the components you'll need and include an unfinished enclosure or masonry bricks that you can stack yourself.
For example, the unfinished gas fire pit kit by HPC features an enclosure with a welded steel frame and Hardie Board shell. You can finish the enclosure with stone, tile, masonry brick, or metal in the color of your choice to match your outdoor furniture and decor.
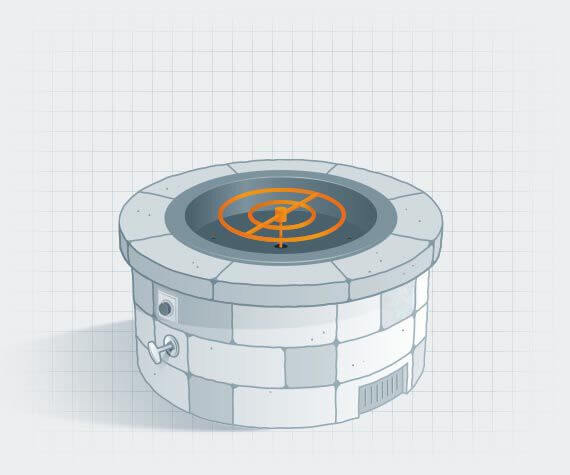
Burners & Components
Burner
The most important feature of your gas fire pit is the burner because it’s used to burn the gas and determines the size and height of the fire.
Burners are available in a wide range of shapes, sizes, materials, and BTU capacities. Research the types available and their BTU outputs to ensure you get the proper flame presentation.
You can purchase a burner by itself, or you can get a fire pit burner kit, which comes with all the components you’ll need to assemble your burner system.
There are also drop-in style burner bowls and troughs available that rest on the top ledge of your fire pit enclosure.
Check out our deep dive on fire pit burners to learn more about how they work and all the styles available!
Pan
Burner pans sit directly under the burner and hold your media, such as lava rock, fire glass, or gas logs. While some burners arrive with the pan already attached, other models require the pan to be purchased separately.
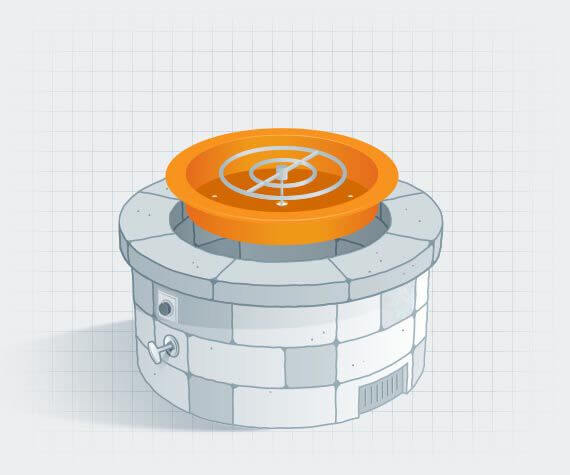
If you're buying a pan separately, you'll need to consider the size and shape of the fire pit, and if you'd like the pan to be recessed into the surface or sit flush with the top.
You'll need to find a burner pan with a diameter that's large enough to provide approximately three inches of clearance from the sides of the burner to the edge of the pan.
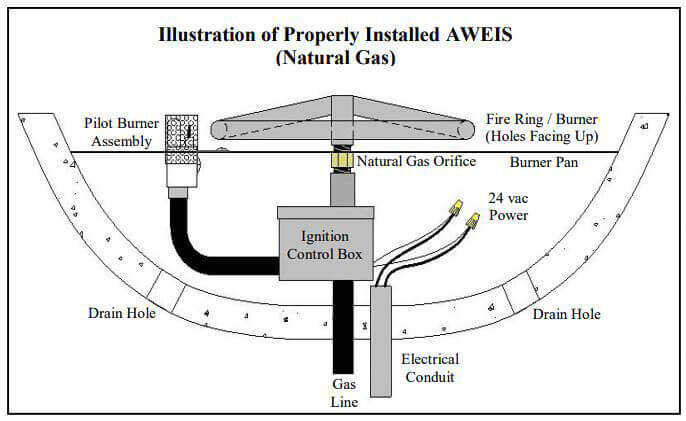
Connectors & Fittings
Connectors and fittings are the components that sit inside the fire pit enclosure and are used to route the gas to the burner.
These parts include a connector hose with fittings, which is a small, flexible pipe that attaches the gas valve to the burner and a gas regulator, valve, and orifice.
Flexible Gas Line
You’ll want to avoid corrugated pipe, elbow connectors, and sharp turns in your flexible gas line; otherwise, your fire pit won’t receive enough gas flow, and you’ll hear unpleasant whistling sounds when you use it.
We recommend purchasing a whistle-free flexible line to connect the gas to your burner system for the best results.
You’ll also need to ensure your gas line is the correct size. The wrong size gas line will prevent the right amount of fuel from reaching your fire pit, resulting in low flames and poor burner performance.
Pro Tip:
You can avoid low flames and poor burner performance by making sure you have the right size gas line to supply enough fuel to the burner. If you have an existing gas line that's the wrong size, you can have it modified by a gas plumber.
Air Mixer
If you're using Propane, you'll need an air mixer. These work by pulling in fresh air to mix with the Propane before exiting the burner for combustion.
Air mixers must be installed vertically and as close to the burner as possible. If it's installed horizontally or is connected to an elbow, airflow will decrease, causing gas to leak out underneath the burner pan.
To determine which type of air mixer you need, refer to the manufacturer's requirements in the instruction manual that comes with your burner system.
Some burner systems, such as the Bullet Burner by The Outdoor Plus, don't require an air mixer. These burners are equipped with small air mixers in each jet that create the perfect air-to-gas ratio, resulting in supercharged flames that burn cleaner while using less gas.
Media & Accessories
Media
Media sits on top of the burner and pan to hide them from view and helps distribute the gas evenly for a natural flame pattern.
There are a variety of different media options available to achieve your desired look. If your style is more traditional, we recommend choosing ceramic gas logs or lava rock media. For a modern look, consider adding a bed of fire glass, fireballs, or firestones.
Media should only cover the burner by one inch with proper gas pressure. If you're using a burner with jets, like the Bullet Burner by The Outdoor Plus, you'll only cover the tube with media and leave the jets exposed. Your media can sit flush with the jets, or the jets can stick out a bit above the media.

Pro Tip:
Propane will leave a sooty residue on fire glass. Consider using darker colored fire glass or lava rock to hide the appearance of soot. If you prefer lighter colored fire glass, you can easily clean the residue off by removing the fire glass and washing it in a bucket of soapy water. Let it air dry before placing it back on the burner.
Wind Guards & Covers
If you live in a windy area, you’ll want to consider purchasing a glass wind guard, which wraps around the edges of your fire pit to shield the media and burner.
Not only does a wind guard preserve your flame presentation on windy days, but it also prevents stray sparks from floating out of your fire pit.
We also always recommend putting a protective cover over your fire pit when it’s not in use.
A durable, weatherproof cover protects your fire pit from harsh weather conditions and helps prevent rusting and deterioration, so you can enjoy your new fire pit for years to come!
Ignition Options
The ignition system is used to start and control the fire. Whether you prefer to light your fire pit manually or want the convenience of a remote-operated, automatic system, there’s an ignition type available to fit your project.
Match-Lit Ignitions
Standard, match-lit ignition systems are budget-friendly and don’t have any moving parts, making them incredibly easy to install and maintain.
Most match-lit systems include a burner, flexible gas line, gas shutoff valve, and an air mixer for Propane fire pits.
To operate a match-lit system, you’ll simply open the valve on your fuel supply, hold a lighter or matchstick over the burner, and slowly turn on the gas. You can then adjust the flame height by turning the included key valve.
The Small Tank Torpedo Match-Lit Fire Pit Insert by HPC is one of our most popular match-lit ignition systems. It arrives with the burner and pan fully assembled, is compatible with Natural Gas and Propane, and features a Penta-shaped design for campfire-like flames.
Push-Button Ignitions
Just like lighting a grill, push-button ignition systems operate with a battery-powered ignitor probe placed in the burner pan on a button module mounted on the fire pit. When you push the button, the probe sends a spark to the burner to light your fire pit.
Though a step up from match-lit systems, push-button ignitions don’t require electricity.
The Push-Button Ignition Fire Pit Kit by HPC comes with everything you’ll need for your fire project, including a stainless steel pan and fire ring that won’t rust or corrode as your fire pit sits out in the elements. It also features a Penta-shaped burner for tall, full flames and up to 150,000 BTUs of heat.
Pro Tip:
Even though you won’t need a source of electricity for your push-button spark ignition system, you will need to make sure you have a solid earth connection for the grounding wire of the spark ignitor.
Automatic Ignitions
Automatic, also known as electronic ignitions are the most expensive ignition option and typically require an electrical connection. They provide the highest level of safety and offer you the simplest and most convenient way to light your fire.
You can hire a licensed electrician to install a power line and route it to your fire pit, or you can purchase a battery-powered system.
All automatic ignitions include a flame-sensing pilot feature that monitors the flame in your fire pit and shuts off the fuel supply if the fire ever goes out.
Fire pits equipped with automatic ignitions can be controlled by a wall switch, remote control, Bluetooth app, or smart home system.
Controls
Now, you’ll need to decide how you want to control the gas and fire.
Based on the ignition system you choose, there are three different control options, including:
Key Valve - A shutoff valve mounted at the fire pit base is used to control the amount of gas flow to the burner.
Control Knob - A control knob opens and closes the gas valve, which turns the gas on and off. A push-button ignitor placed in the burner pan creates a spark that ignites the fire.
Remotes & Wall Switches – Exclusively used with electronic ignition systems, hand-held remotes let you turn the fire pit on and off from anywhere in your outdoor space. Some remotes even allow you to adjust the flame height. Alternatively, if you have an automatic ignition system, you can have your fire pit wired to a simple wall switch for quick on/off operation.
Call for Backup
Once you have all your fire pit components picked out, it’s time to put them all together. Doing everything yourself to save some money may be tempting, but the risks associated with installing your gas fire pit incorrectly far outweigh the cost of hiring a professional.
Hiring a trained gas professional is the best course of action you can take to prevent potential fire hazards, injury, or death and ensure your fire pit is operating the way it’s designed to.
A gas professional will be able to assess your property quickly, install a Natural Gas line, correctly hook up your fire pit, and check for gas leaks and weak connection points.
Putting It All Together
Now that you have everything picked out, we’ll walk you through how your components fit together in both manual and automatic ignition systems.
But remember, this is not something you should do yourself. When it comes to gas and electrical installations, it’s imperative to have them done by licensed professionals.
Manual Ignition
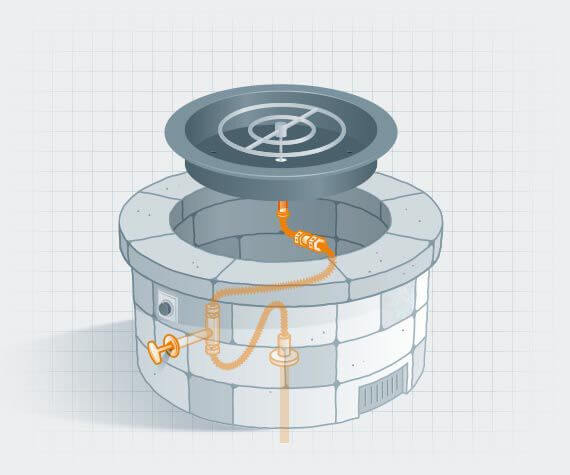
First, the gas line is routed to the location of the fire pit, and the enclosure kit is placed on top.
Next, one side of the key valve is connected to the gas stub and the other to the flex hose. The flex hose is connected to an air mixer (only with Propane), then the air mixer to the pan and the burner to the pan.

Before setting the burner and pan in place, you’ll test for gas leaks at each connection (burner to air mixer, air mixer to flex hose, flex hose to key valve, and key valve to stub).
After the gas connections are tested and ready to go, you’ll set the pan and burner into place.
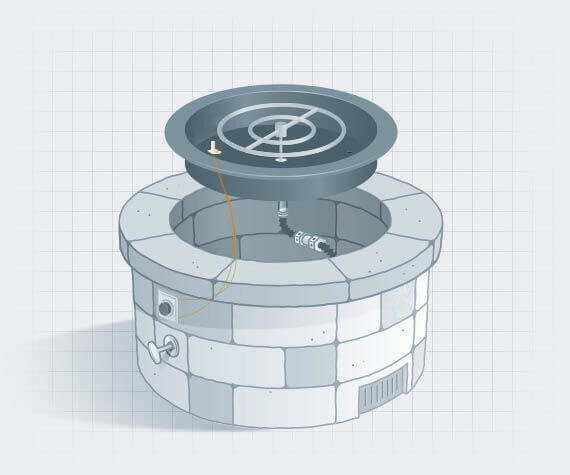
Next, you’ll check the ignition and burner to ensure the gas flows adequately and the burner produces the desired flame presentation.
The flame pattern may not look completely accurate at this point since there isn’t media on top to disperse the gas flow, but you’ll be able to see if the gas pressure is off (low flames) or if the burner isn’t working correctly.
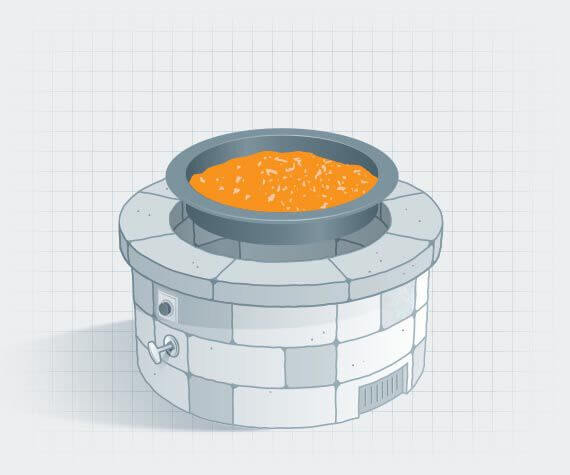
Once you’ve determined everything is working as it should, you’ll turn the fire pit off and fill the pan with media, adding enough to cover the burner by one inch (let the burner cool first).
Next, you’ll finish the outside of the enclosure with your desired finishing material.
Finally, turn it on, make sure the flames look good, and sit back and enjoy the fire!

Automatic (Electronic) Ignition System
Automatic ignition systems require both gas and electricity to function. Most automatic ignitions are hardwired, plugged in, or battery powered. How you want to control the fire pit will determine how your electrician will do the installation.
You should also consider including a gas shut-off valve approximately 20 feet away from the fire pit. This will ensure you can cut the gas supply off to the fire pit in case of an emergency.
First, gas is routed to the location of the gas shut-off valve, then to the fire pit. Next, if you have hardwired power, a junction box will be installed remotely from the fire pit, and for plug-in power, an outdoor-rated outlet will be installed inside the fire pit.
From here, you'll follow the manufacturer's instructions for installing your particular automatic ignition system.
When it comes time to test your gas connections, you'll also need to check the automatic ignition system to make sure your electrical connections are working.
Once you've determined the gas and electrical systems are working as they should, you'll add the media, covering the burner by one inch, finish the enclosure, then run another test fire to make sure the flames look good.
Sit back and enjoy!
Pro Tip:
Any fire pit that we sell for a commercial application (restaurant, hotel, multi-family application, etc.) must include an automatic ignition system, emergency stop button, and a timer.
FAQs
Many times, yes. There are municipalities that require permits for running gas lines or installing permanent outdoor gas appliances.
Always check local building codes and HOA regulations before you start planning your fire pit project.
The right gas line size depends on:
- BTU rating of your fire pit burner
- Your fire pit's distance from the gas source
- Whether you use natural gas or propane
If your gas line is too small, you'll experience weak flames or ignition issues.
Be sure to hire a licensed gas professional to calculate the proper sizing, so your fire pit performs safely and efficiently.
No. Always use a burner rated for outdoor fire pit use and matched to your fuel type (natural gas or propane).
Using the wrong burner can cause poor performance or dangerous gas buildup.
Most residential gas fire pit burners range between 40,000 and 150,000 BTUs.
- Smaller patios: 40,000–70,000 BTUs
- Medium gatherings: 70,000–100,000 BTUs
- Large statement features: 100,000+ BTUs
Higher BTUs produce taller flames and more heat — but also use more fuel.
- Propane: Easier to install, portable, great for flexibility
- Natural Gas: Lower long-term fuel cost, continuous supply, no tank refills
Choose based on accessibility, budget, and how permanent you want the installation to be.
We're Here to Help
Have more questions about building a DIY gas fire pit? We'd love to help! Call our team of NFI certified experts today at 800.919.1904.
More Resources
Get the gorgeous flames you want with one of our top gas fire pit burner kits.
Not sure how you'd like to light your fire pit? Learn about each ignition type to make your decision.
Keep your wood or gas fire pit in tip-top shape with these fire pit safety & maintenance tips.

Garrett Jamieson has been a Technical Sales Representative at Woodland Direct for over a decade. As an NFI-Certified Master Hearth Professional, he's well versed in fire products and safety standards. He strives to help clients understand product features and best installation practices, so they can find products that fit their home and lifestyle. Outside of work, Garrett spends most of his time outside, riding bikes, bowling, camping, grilling, chopping wood, and tackling DIY projects with his family. Call him or one of our experts in fire at 800.919.1904.