By: Tom Regis, NFI Certified Master Hearth Professional
Last Updated: March 26, 2025
Fire pits are among the most popular outdoor design features requested by homeowners who want to elevate the ambiance in their backyards and patios.
If your client dreams of hosting comfortable outdoor gatherings year-round, installing a gas fire pit may be the best solution.
With so many fire pit designs, sizes, and colors to choose from, your client can easily find a model that complements the layout of their outdoor space and has all the features they’re looking for.
No matter which fire pit style they choose, the installation process requires some careful preparation. We've provided our top three fire pit installation tips to help you complete your client's project safely!
#1 Assess the Area
Before your client can choose a fire pit, you’ll need to assess the area it will be installed in.
The layout of the space and its overall surroundings will help determine the appropriate fire pit design, size, and BTU output.
Here are some common questions to ask as you evaluate your client’s space:
- Are there any trees located nearby?
- Are there low-hanging plants in the area?
- Is there anything overhead, such as an awning?
- Are there power lines overhead?
- What furniture or other design features will be in the space?
- Will the fire pit be too close to the house or other building?
- What kind of surfaces are available to install the fire pit on?
- Can the space accommodate a Natural Gas line or safely store a Propane tank?
Construction
While adding a fire pit to your client’s property doesn’t require any major renovations, there are logistical factors to consider. Like any construction project, you will need to acquire the proper permits prior to installation and pass an inspection once the fire pit is installed.
Only a licensed gas professional will be able to install your client’s fire pit. It’s important to follow the steps and clearance requirements outlined in the installation manual, otherwise, the installation will not pass inspection and your client’s safety could be at risk.
Fire pits also cannot be installed below the grade of the ground. Doing so will void the product’s certification and warranty, and prevent it from venting and draining properly.
Clearances
The fire pit should be placed in an open space with plenty of airflow, and never under low-hanging trees or near flammable materials.
Once your client picks out a few fire pit models they like, you will need to make sure the space meets all the manufacturer’s requirements outlined in the installation manual. You’ll also need to double-check your client’s local city fire codes and ordinances to make sure it’s legal to operate that particular fire pit in the area.
Fire pits should be placed at least 20-25 feet away from a house or combustible structure.
The amount of clearance required on each side of the fire pit and above the burner will vary, depending on the model your client chooses.
Consult the installation manual to verify how much clearance your client’s fire pit will need.
Fire pits can be installed in semi-enclosed spaces, like covered patios, as long as there is enough airflow and ventilation, and the installation is approved by the city.
If your client has an awning covering their outdoor space, you’ll need to consider the height of the flames. Your client may need to choose a fire pit with a lower BTU output to make sure there is enough clearance above the burner to operate safely.
Ventilation
All fire pits require ventilation, regardless of the model your client picks.
Ventilation provides fresh air for the ignition system to operate efficiently and allows for continuous airflow and water drainage.
In addition to preventing gas leaks underneath the burner, ventilation also keeps excess gas and heat out of the fire pit enclosure. Gas leaks and build-up are extremely dangerous and could result in fire hazards and even explosions.
Ventilation should include at least two built-in air vents on opposite sides of the fire pit. If your client’s fire pit doesn’t have an open-bottom design, you can create adequate airflow by installing the fire pit on risers to elevate it off the ground.
Final Location
Ideally, the fire pit should be installed on a flat, level surface, like a stone patio, deck, or flat yard.
For installations on decks, you will need a non-combustible base underneath the fire pit to prevent radiant heat from transferring to the surface below.
The non-combustible base should extend out at least 24 inches all the way around the fire pit. Keep in mind, the base will take up even more space, which could affect the final placement of the fire pit.
For grass installations, a non-combustible base isn’t required, but you will need to make sure the fire pit is installed on a surface that can support its weight. If the ground begins to shift slightly over time, the fire pit will move out of place and could begin to operate inconsistently.
Pro Tip:
If you’re installing a fire pit on the grass, you can use a layer of sand or pea gravel as your non-combustible base. For deck installations, you can use bricks, pavers, Hardie Board, or Dura Rock.
#2 Determine the Fuel Source
Prior to installing your client’s fire pit, you will need to verify what kind of fuel source they have available on-site — Natural Gas or Propane.
Once you know which fuel source you’re working with, you’ll be able to confidently direct your client to a gas fire pit that’s appropriate for the space and meets all their needs.
Natural Gas
Running a Natural Gas line provides a constant fuel source for the fire pit, which means your client won’t have to worry about the fire going out or running low on gas.
With a Natural Gas line, your client will also be able to select a fire pit model with a higher BTU output for a larger fire and more warmth.
If your client doesn’t have a Natural Gas line, a licensed gas professional will need to hard-pipe one to the fire pit’s final location prior to installation.
It’s important to make sure the gas line is sized properly, so the fire pit will receive enough gas to meet the burner’s BTU requirements.
An incorrect gas line size will result in small, candle-like flames, instead of the full, dynamic presentation your client is expecting, and may make the fire pit completely inoperable.
It’s also possible to run the same gas line to more than one product in your client’s space. In this case, it’s especially important to make sure the gas line is sized correctly as the BTU output drops significantly when you run a gas line to multiple fire features.
Propane
If your client likes the idea of having a portable fire feature that doesn’t require much installation, Propane is the best option. You’ll simply hook up a Propane tank to the fire pit, check for gas leaks, and ignite the fire.
Installing a Natural Gas line is more expensive initially, but using Propane comes with hidden costs, including replacement tanks and Propane tank enclosures.
The BTU output for Propane fire pits is also more limited, resulting in a smaller flame size and less heat coverage than Natural Gas fire pits.

For clients who aren’t keen on seeing their Propane tanks out in the open, there are fire pits and tables available that hide Propane tanks from view.
These hidden-tank fire features house the Propane tank in the base and include an access door to easily tend to the tank or replace it when it’s empty.
If your client opts for a style that can’t house a Propane tank underneath, the tank will need to be stored outside of the fire pit, usually within 10 feet.
They also may be able to find a matching Propane tank enclosure to streamline the look of their space.
#3 Review Ignition Options
Another key factor to consider prior to installation is how your client wants to operate their new fire pit. There are several ignition options available, including match-lit, push-button, and electronic ignition systems.
First, you’ll need to review the client’s building and city codes to make sure the type of ignition they select is permitted. For example, some areas have outlawed the use of match-lit ignition systems due to the minimal safety features included in them.
Manual Ignition Systems
If your client doesn’t have access to a supply of electricity outside, they can purchase a manual ignition system.
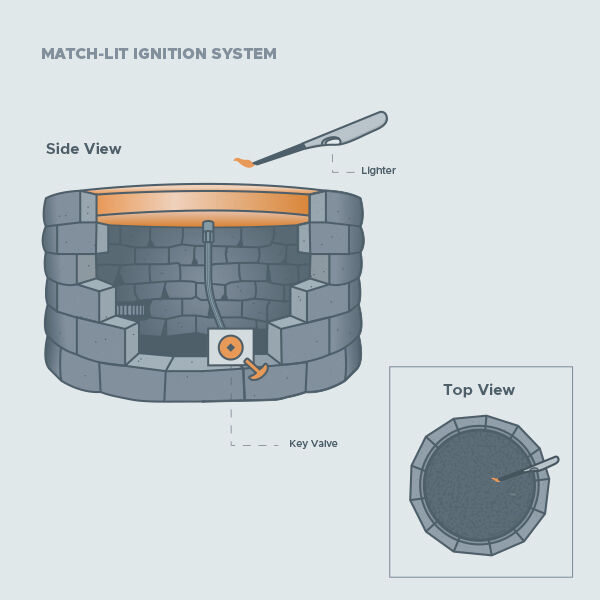
The most straightforward way to light a fire pit is with a standard match-lit ignition. This system is ideal for quick and easy projects because it’s budget-friendly, easy-to-install, and virtually maintenance-free.
Your client will be able to operate their match-lit ignition by simply holding a lighter or matchstick over the burner and turning on the gas.
Push-Button Ignition Systems
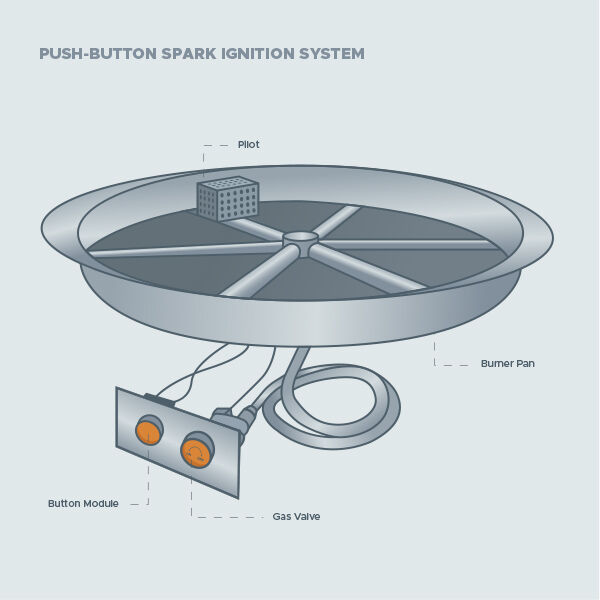
Push-button ignitions are a step up from match-lit because they operate with the touch of a button. Just like firing up a grill, push-button systems feature a battery-powered ignitor probe placed in the pan base close to the burner and a button module mounted on the outside of the fire pit.
Most push-button ignitions include a built-in, flame-sensing safety component on top of the burner, which continuously monitors the flame in the fire pit. If the fire is extinguished for any reason, the fuel supply automatically closes to prevent gas leaks or gas cloud buildups.
Even though push-button ignitions don’t require electricity, you’ll still need to make sure there is a solid earth connection for the grounding wire of the spark ignitor.
Electronic Ignition Systems
Though they’re more expensive than manual ignition systems, electronic ignitions are the safest, most convenient option on the market.
Your client can have a power line installed and routed to the fire pit or purchase a battery-operated electronic ignition system, enabling them to operate the fire pit with a wall switch or thermostatic remote control. Some systems can even pair with Smartphones via Bluetooth.
Whichever electronic control option your client chooses, they'll be able to operate the fire pit conveniently from the comfort of their seat, or even somewhere private to prevent guests from tampering with the control settings.
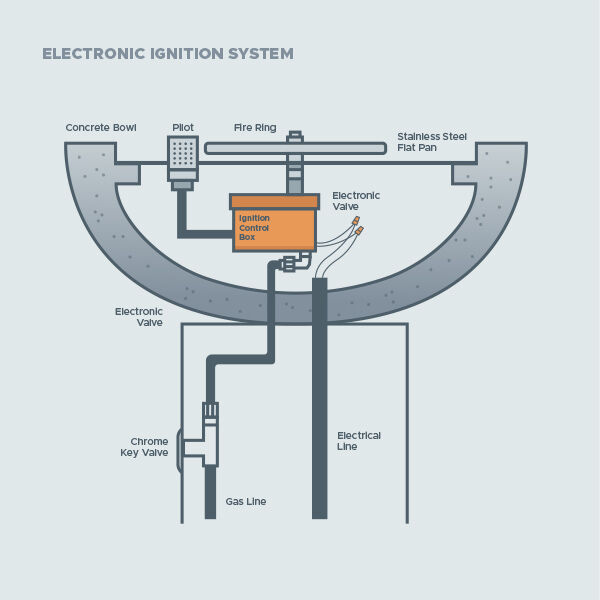
All electronic ignitions have a flame-sensing pilot feature that activates when you ignite the fire pit. If the flame goes out, the system automatically shuts down to prevent gas leaks. This makes electronic ignition systems ideal for safety-conscious homeowners and commercial settings.
Electronic Ignition Installation & Safety
If your client’s fire pit requires electricity, it’s important to select the right voltage. A licensed electrician will need to determine the proper circuit required and hard-wire an electrical line to the fire pit.
An emergency electrical shutoff switch will also need to be installed on the exterior of the fire pit or an adjacent wall for emergency shutdown and system maintenance.
Pro Tip:
There are certain residential requirements for electronic ignition systems located within 10 feet of water, such as pools, ponds, or fountains. Be sure to do your research ahead of time to find the safest location to install your client’s fire feature.
Smart Home Integration
The ability to operate a fire pit with voice commands (“Hey, Siri, turn on my fire pit”) and the convenience of having complete control of the fire in your pocket at all times, makes choosing Smart Home integration a no-brainer for homeowners looking for the ultimate user-friendly experience.
With an electronic ignition, your clients can integrate their fire features into an existing Smart Home system, such as Apple HomeKit, Google Nest, or Amazon Alexa.
There are even Smart outdoor-rated outlets available that make the integration process quick and simple.
Prefer to Listen?
We're Here to Help
Have more questions about installing a gas fire pit? We’d love to help! Call our team of NFI certified experts today at 800.919.1904.
More Resources
Grow your business by offering clients a way to enjoy their outdoor spaces year-round!
Is your client stuck on finding the perfect fire pit? Browse our top 5 gas fire pits to help steer them in the right direction.
Read through the different types of ignition systems to find one that meets all your client’s needs.
 |
Thomas Regis has been a Technical Sales Representative at Woodland Direct for four years. An NFI-Certified expert, Thomas effortlessly directs his clients toward the perfect products, offering essential installation and safety advice. He's tackled projects of all sizes, from backyard fire pits to custom indoor fireplaces. He has even helped Amy Adams, owner of the Tennessee Titans, find a new fireplace for her home! Beyond his professional achievements, Thomas actively participates in community service projects and enjoys spending time on the basketball court. Call him or one of our experts in fire at 800.919.1904. |
